
Your Essential Guide on How to Program Your Robotic Welder
This guide will take you through the process, step-by-step, showing you exactly how to program our Cobot Welder using your smartphone or tablet.
Step 1
Creating a Part
Begin by opening the Beacon app on your device and heading over to the "Parts" tab. Here, you’ll notice a plus button situated in the bottom right corner of the screen - this is your gateway to creating a new part.
When you tap this button, you’ll be prompted to name your part. Choose a name that’s both unique and descriptive for easy identification down the line.
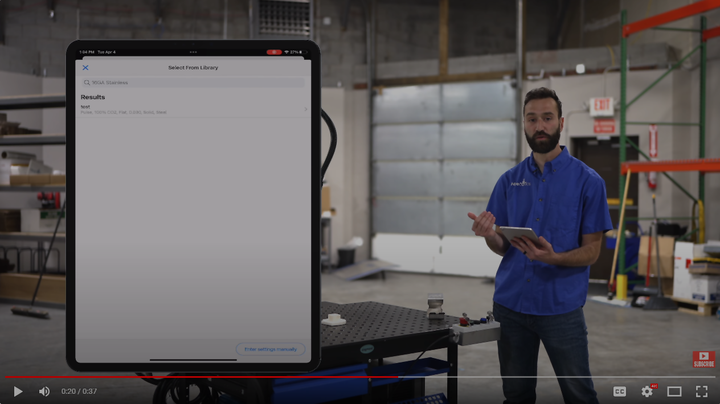
After assigning a name, tap "Next" and you’ll be given two choices: select predefined weld settings or enter the settings manually.
In our example, we’re using the predefined settings. Simply select the settings that suit your requirements best, and voila - you’ve just created your first part!
Step 1
Creating a Part
Step-by-Step Video
Top Tip: Adjust your Weld Settings

Adjusting Weld Settings: Step 1
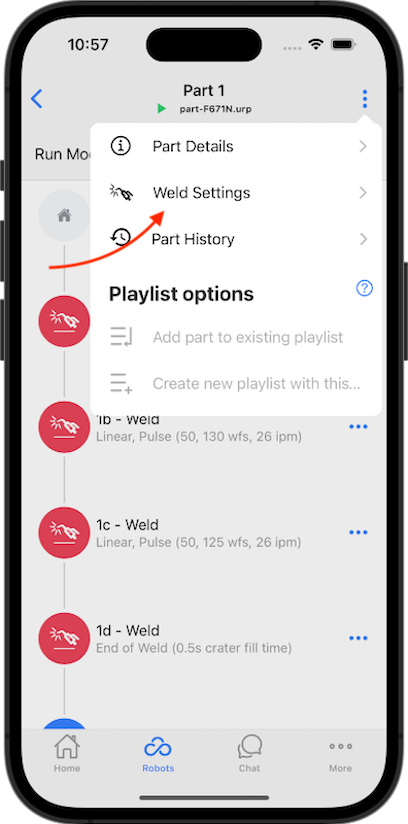
To update part settings, with your part open, click on the three vertical dots in the upper left corner to open the part menu. Then tap the "Weld Settings" option.

Adjusting Weld Settings: Step 2
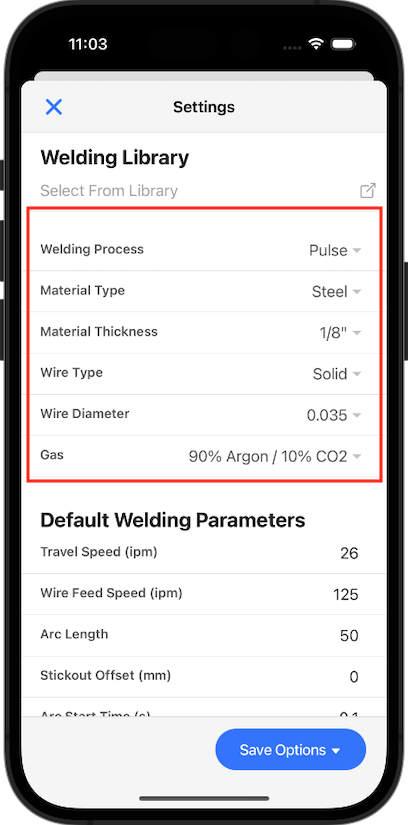
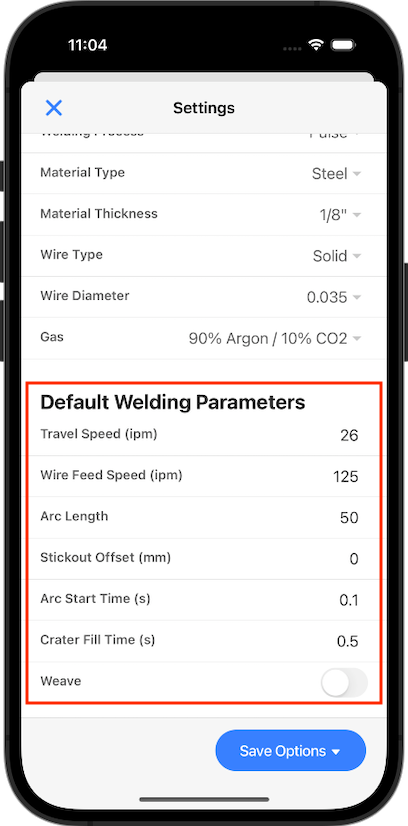
You will now see a screen that displays a section with part settings as well as the default weld parameters. You can change any of these settings as well as the defaults by tapping the inputs and updating their values.

Adjusting Weld Settings: Step 3
Customise your weld process settings and switch between weld modes and available processes in this input. You can also change material type and thickness, wire diameter, and shielding gas used to achieve your perfect weld.


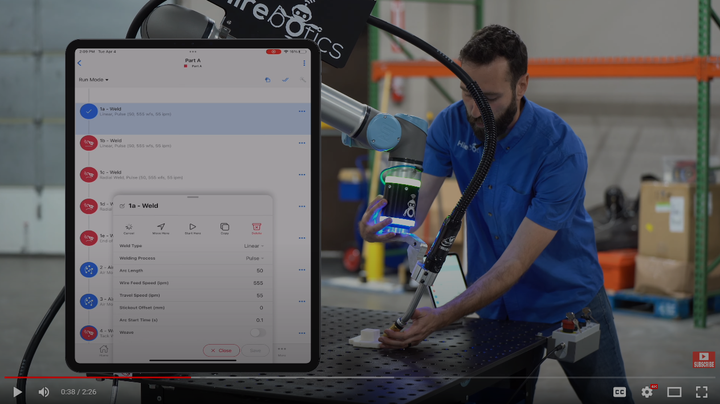
Editing Individual Weld Settings: STEP 4
Individual weld items can be altered from the default by selecting any weld item in the part. When tapping a weld item, a panel with weld settings will appear allowing you to edit any of the weld parameters.
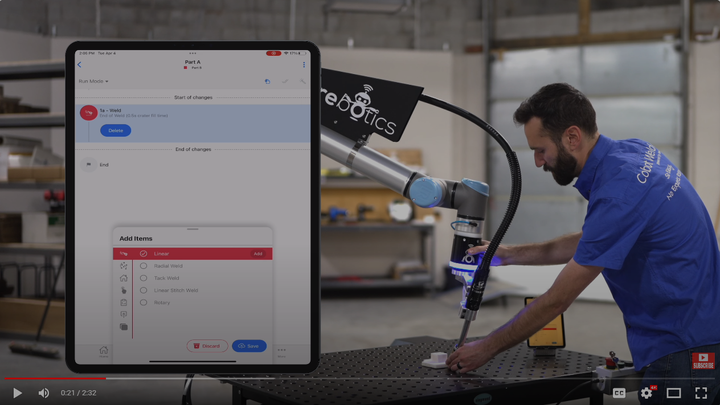
Step 2
Teaching a Linear Weld
Step-by-Step Video

Step 2
Teaching a Linear Weld
Creating a linear weld is a surprisingly simple process. Start off by ensuring "Linear" is highlighted on your device; at this point, you can put your device aside.
The magic happens with the Hirebotics smart puck, specifically the two buttons on it. These buttons will help you move the robot and teach your program. The top button (green) is for moving the robot around in the UR’s “Freedrive” mode. Once clicked, it allows you to guide the robot to your desired position. The bottom button (blue) saves your points.
For a linear weld, the process is as follows:
- Using the green button on the smart puck, move the robot to the start of where your linear weld will be.
- Once in position, press the blue button to save this starting point. You’ll notice that the app acknowledges this by populating a point.
- Next, click the green button and move the robot to the second point, and press the blue button once more to save the endpoint.
Just like that, you’ve created your first linear weld!
After you save the weld you’ve just created, create a new playlist with this part. These playlists are similar to what you make on a music app like Spotify. They are meant to cue the different parts you want to run on your Cobot Welder, and they start once you hit play on the operator box.
You can now watch as your robot flawlessly performs the weld you’ve just programmed!
Top Tip: As you noticed, you don’t have to program the “approach” or “exit” point like you do with other welding robots because we have programmed those for you. All you have to do is teach the start and end point of the weld itself.
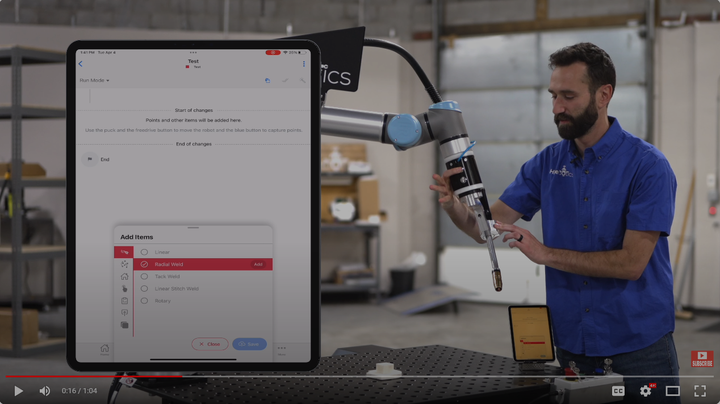
Step 3
Teaching a Radial Weld
Creating a radial weld follows a similar process as the linear weld, with just a slight twist.
Start the process by highlighting "Radial Weld" in the app on your device. Now, turn your attention back to the robot and the smart puck.
A radial weld requires a minimum of three points around the circumference of your part.
Step 3
Teaching a Radial Weld
Step-by-Step Video
- Start by positioning the robot at the beginning of your radial weld, then hit the blue button to save this starting point.
- For your second point, move the robot to the midpoint of your circle and, again, click the blue button.
- Finally, move it to the end of the radius and hit the blue button for the third time.
Now, you have your three points defining your radial weld! After setting these points, hit "save" on your device. Now, all that’s left is hit "play" on your operator box. Your robot will carry out the radial weld as per your program. A perfectly executed radial weld, done with ease!
Top Tip: If you need to make a full circular weld, click here to find tips to make a radial weld into a full circle.
Step 4
Teaching Tack Welds
Step-by-Step Video

Step 4
Teaching Tack Welds
Setting up tack welds is another handy feature that your welding robot can effortlessly perform.
To get started, grab your device and highlight "Tack Welds" within the app. Now, it’s time to utilize the smart puck again.
- Start by pressing and holding the green button to maneuver the robot into the desired position for your tack weld.
- Once you’re happy with its position, click the blue button to save the point.
- Should you wish to create multiple tack welds, simply repeat this process. Use the green button to position the robot and the blue button to save each point.
- When you’re finished, hit "Save" and "Play" on your device to finalize the process and watch as your robot accurately executes the tack welds you’ve just programmed.
Top Tip: In many cases, you may need to add points between welds to get more control of the robot’s movements. This can be useful if the robot can’t go straight to the next weld due to an obstacle. Jump to the Air Moves section to learn how to do this.
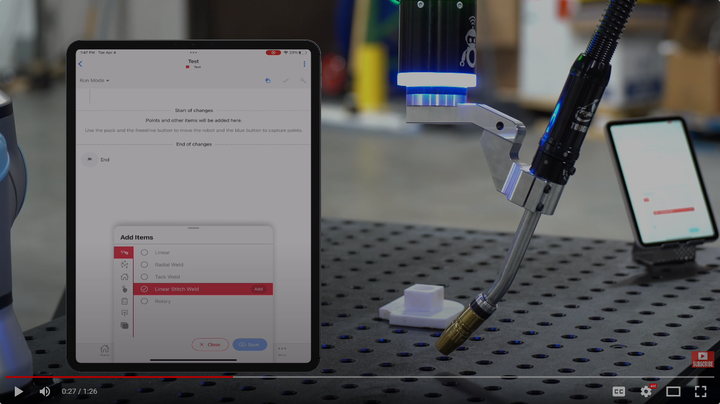
Step 5
Teaching a Stitch Weld
Mastering stitch welding with your robot is an incredibly simple and straightforward process. Start off by grabbing your device and highlighting "Linear Stitch Welds".
Grab your smart puck and select two points. You do not have to select the start and the end of each stitch; rather you select the start and the end of the entire length that you would like to be stitched.
Position your robot at the starting point of your desired stitch length and press the blue button to save this point. Repeat the process for the endpoint of your stitch length.
After saving these points, it’s time to define your stitches.
- In the app, select the first point you created.
- Here, you’ll be able to specify both the number of stitches you want along the length and the length of each stitch. For example, you might want four stitches, each two inches long.
- After setting these parameters, hit "Save" and "Play" and watch as your robot seamlessly executes the stitch welds just as you’ve programmed.
Step 5
Teaching a Stitch Weld
Step-by-Step Video
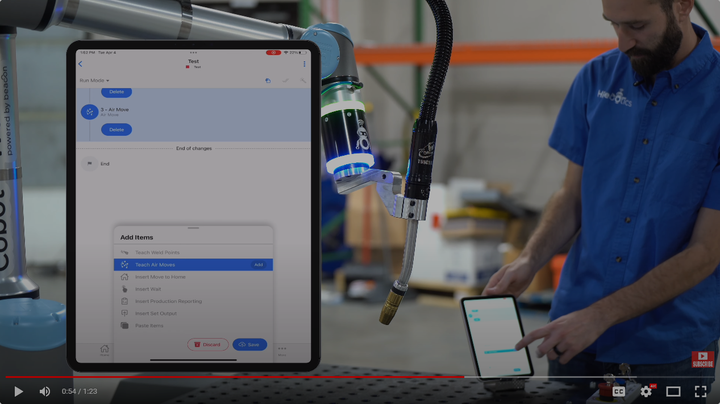
Step 6
Setting up Air Moves
Step-by-Step Video
Step 6
Setting up Air Moves
A remarkable feature of the Hirebotics Cobot welder is the ability to automatically generate approach and exit points.
However, there could be instances where the robot might collide with a part, clamp, or fixture. To circumnavigate such potential obstructions, you can easily add "Air Moves", to go around them before you start moving.
To get started, select the "Teach Air Moves" icon. The process of teaching these moves is similar to any other weld points.
To teach an air move, grab the smart puck. Use the green button to move the robot. Start by moving the robot straight up to navigate around any obstruction.
Once you’re content with the height, save that point by clicking the blue button.
You can add as many of these sequential moves as needed. Once the air moves are set, you can go ahead and set up your linear weld.
Once you’re done with this, don’t forget to hit "Save" on your device to secure these settings. Now, hit "Play" to see it in action. The robot will perform the air moves sequence to avoid any obstruction before it begins the linear weld.
Step 7
Creating a Playlist
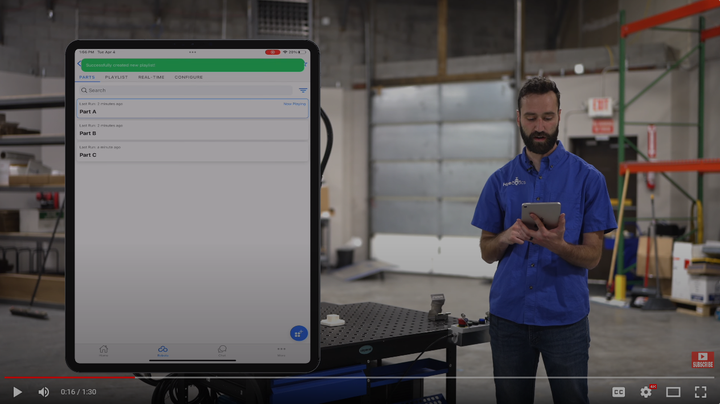
Now that you have successfully created and programmed various parts, the next step is to run them. If you only need to run a single part, simply select the desired part, and create a newpart playlistfeaturing this part.
Once done, head to your "Playlist" screen, the second tab on your device, and you’ll see "Part A" listed on your playlist.
If you want to run back-to-back parts, return to your "Parts" screen. Select the additional parts you want to run and add them to your existing playlist. When you return to your "Playlist" screen, you’ll notice that the parts have been sequenced in the order they were added.
Step 7
Creating a Playlist
Step-by-Step Video
To start the sequence, just hit "Play". The robot will run the parts as they are listed in the playlist. Without going back to the app, you can simply press "Play" again, and it will proceed to run the next part of the playlist.
You can even have the parts auto-play one after the other using the "Auto-Play" icon.
This playlist functionality provides the flexibility to have one or one hundred parts in your playlist, bringing convenience and efficiency to your production process!
Step 8
Using the Operator Box
Step-by-Step Video
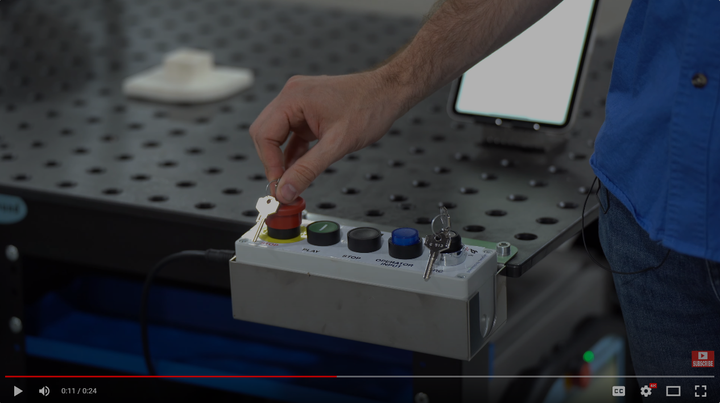
Step 8
Using the Operator Box
Let’s shift our focus to the Operator Box, a critical piece of equipment that empowers your operators to control the robot without requiring access to the app.
The Operator Box comes equipped with five buttons:
- E-Stop button
- Play and pause button
- Stop button
- Operator input button
- Arc On/Off Key
Step 9
Combining Welds
You can now incorporate all the welding moves we’ve learned so far in the same part.
Here is an example showcasing how easy it can be to teach a whole assembly with multiple weld types.
Step 9
Combining Welds
Step-by-Step Video
Step 10
Editing a Part
Step-by-Step Video
Step 10
Editing a Part
Imagine you’ve created your part, but upon the first runs, you realize it needs adjustments. Not to worry, the flexibility of our programming allows for effortless editing of the established parameters.
Let’s take a look at how we can adjust a point in your part.
- Select the first point on your device, and use the "Move Here" icon to instruct the robot to move to the specified location.
- To start moving, hold the operator input button (blue) on the operator box.
- Now that the robot is at the original point, we can fine-tune details like the torch angle or distance from the point using the "Touch Up" icon.
- Make the necessary adjustments and then click the smart puck blue button again to save the new position.
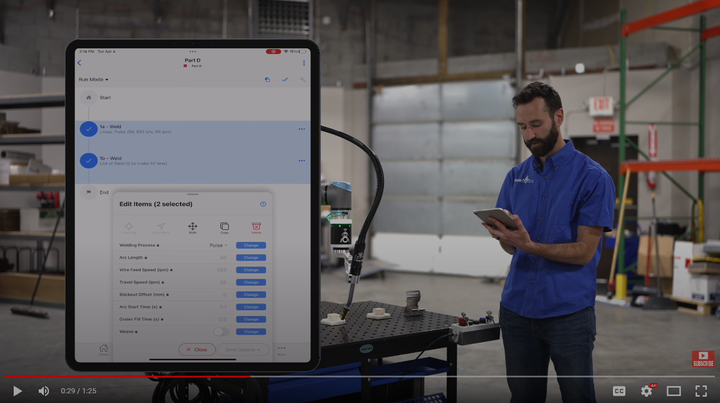
But what if you want to alter the weld settings or processes?
- Click on the parameter you want to change.
- Let’s consider "Wire Feed Speed". You can simply adjust it to your preferred value, let’s say "500".
- The same applies to other parameters such as "Travel Speed". If you desire a weaving pattern, toggle the "Weave" option to "On".
- Remember to hit "Save" once you’re done.
Next time you execute the weld, it will incorporate these new settings. This adaptive feature provides a dynamic welding experience, ensuring optimal performance and precision.
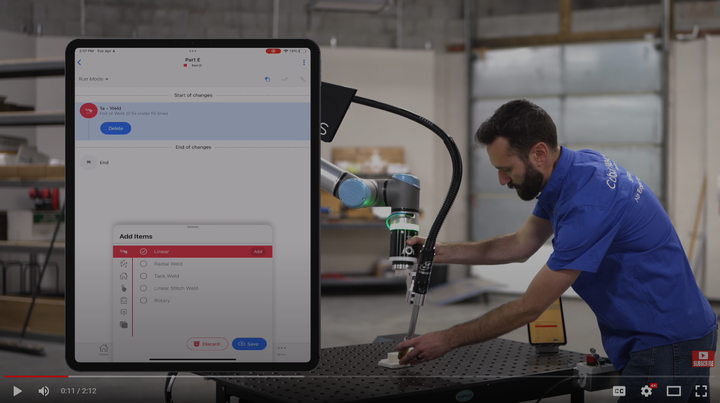
For added flexibility, you can also insert another weld move or sequence. By clicking on the"Wand"icon at the top right of the screen, you’ll see little green"+"icons that allow you to insert additional elements.
Let’s say you want to add an"Air Move"between 2 points. Simply click on the"+" icon and move the robot to the desired position. With this, you’ve successfully added an"Air Move"between your 2 existing points.
Top Tip: Adjusting welding parameters can help improve your weld quality and speed. If you want to learn more about how you can minimize or eliminate common weld issues, visit this page: Troubleshoot Common Welding Issues.
Step 11
Shifting a Part
Now, let’s delve into the concept of "shifting". Imagine that you want to move a specific set of points on the part to a different location on the table.
Shifting a part (or a subset of a part) takes in a set of points and recalculates their position. Shifting updates the position of all selected points. A common use case for this feature is repositioning your fixture to a new location on the table.
Here’s how you can do it:
- Grab your device, and set up a linear weld as usual by teaching the robot the two points that define the weld. Once you’ve established your points, hit "Save".
- The next step is selecting both of these points and selecting the "Shift" icon. The system is now ready to learn a new origin point.
- Now, move the robot to the start of where you want your linear weld to be moved to. Click apply, then"Shift Points".
Step 11
Shifting a Part
Step-by-Step Video
Step 12
Patterning a Part
Step-by-Step Video
Step 12
Patterning a Part
Patterning is another handy technique that allows you to duplicate a series of welds at a different location on your weld table. This is particularly useful when you want to repeat the same weld process on multiple parts without having to program each one separately.
The first step is to start by setting up our original part. Once you’ve set up your welds, save them on your device.
Select all the points you’ve set up that you wish to pattern and click on the "Shift" icon.
Now, you need to establish a new origin point. This point could be, for instance, the starting point of your first linear weld at the new location. Once the origin point is taught, hit "Apply", then select "Pattern Points".
The system will prompt you to insert an "Air Move" between the points to ensure the safe movement of the robot. Simply input this Air Move point.
Upon hitting "Play", you’ll see the robot perform the original sequence of welds, move via the Air Move point, and then execute the same sequence at the new location. By using the pattern function, you’re able to multiply your productivity without having to program each part separately.
Step 13
View Weld Data in Beacon
The advantage of working with a cloud-connected App like Beacon is the ability to stream data in real-time. This feature enables you to access, monitor, and assess the welding processes from anywhere via your smartphone or any other device.
To view your data, all you need to do is navigate to the home screen. Here, you'll find a variety of charts that populate automatically. They offer an at-a-glance view of your ongoing welding processes, displaying critical parameters and metrics.
Step 13
View Weld Data in Beacon
Step-by-Step Video
Beacon provides the flexibility to create custom graphs tailored to your needs. You can track a range of variables such as cycle time, the number of parts welded per minute or per hour, and consumption data like the amount of gas and wire used.
This powerful feature allows for real-time monitoring and precise control of your welding processes, helping optimize efficiency and productivity.
Step 14
Accessing In-App Support
Step-by-Step Video
Step 14
Accessing In-App Support
To ensure you have all the assistance you need at your fingertips, we have integrated a support system directly into our app. This is the same app you would use for programming and adjusting your weld settings. This integration makes it incredibly convenient to get help whenever you need it.
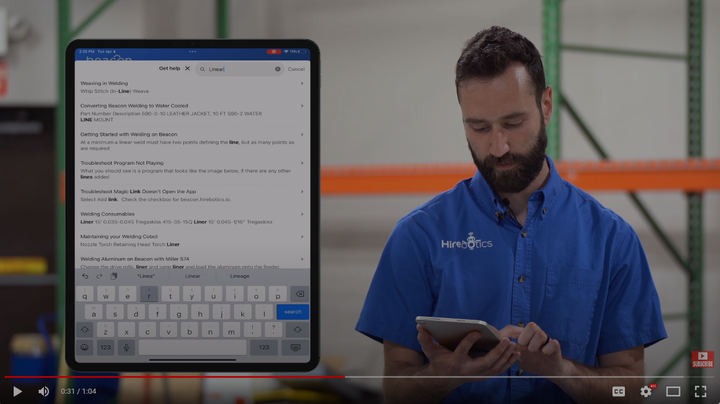
To access this feature, swipe to the left on your app interface, and select the "Support" option. Within this section, you get access to two key functionalities.
The first is a vast library of articles and video tutorials. These resources cover a broad spectrum of topics and are all searchable within the app.
For instance, if you need help setting up a linear weld, just type "linear weld" into the search bar. Click on the most relevant result, and you’ll find a detailed video tutorial from our team.
However, if the library does not answer your queries, you can"Send us a message." Once you use this feature, you can expect a response from an engineer inas little as two minutes.Our team is well-equipped to answer a range of questions, from software-related inquiries to welding process queries. This means you always have expert help on-hand, ensuring your operations run smoothly.